Small disclaimer here. I'm in no way employed or affiliated with Microsoft. I am not selling this information-it is completely free. While I've made a genuine effort to ensure the quality of this manual, there is no warranty provided and I disclaim any accountability and liability for any damages resulting from the utilization of the data provided in this manual or products described in it. All sample exercises and files are fictional and any similarity to real people is strictly coincidental.
That being said- hope this helps!
Today's part covers the following:
From the beginning…Word for the Novice
The Differences Between Save and Save As
Toolbars
Font-Style, Shape, Size
Spell Check
Find and Replace
Bullets and Numbering
Justification and Indentation
Inserting Page Breaks
Inserting Page Numbers
Inserting Date and Time
AutoText
Columns
From the beginning…Word for the Novice
Microsoft Word is a limitless word processing program that provides you with the tools to make great documents, reports, business cards, mailing letters and much more.
To open Word, double click the Word icon on your desktop, or by Selecting Start>Programs>Microsoft Word.
You will be brought to a blank screen resembling a blank piece of paper. To begin entering information, you can start typing on this blank page. If you want to go through a specialized wizard for formatting letters, resumes, memos, faxes, etc., click on File>New. You will be brought to a new screen, enabling you to switch between tabs. From here, select the document you would like the Word wizard to help you create. You may want to experiment with each choice to see which type work for you. Just double click on the icon of your choice and follow the steps the wizard provides, hitting ‘Next’ after each screen.
On the bottom right you will notice there is an option to create a new document or template. The difference between them both is that a document is specific to one occasion, i.e., a one-time letter to your friend without formatting. A template will create a document that you can use various times, providing that you choose SAVE AS after each change. For example, Fax Letterhead. This will always contain your header and footer information, along with any additional detail you add that you want to appear on all your faxes. I will explain SAVE AS later in this book.

- A few important things before we begin. As a rule, I recommend that you save your work in intervals of every ten minutes. Also remember which folder you saved it in! This is not required, but you’ll find it to be imperative if you plan to work on sizable documents. There is nothing more frustrating than working for three hours on a document, only to have your computer decide it wants to take a nap, and there’s no sign of your work ANYWHERE! Believe me, I have done this and have never forgotten it. So, make a mental note before anything else, to save your work.
1. Select Tools>Options>Save.
2. Select the Save Auto Recover check box.
3. In the minute’s box, enter the interval for how often you want Microsoft Word to save documents. More information is recovered if there is a power failure the more frequently it saves. Should be about every 5-10 minutes.
The Differences Between Save and Save As
If you are saving the document for the first time, clicking File>Save will open a dialog box, as shown, allowing you to choose which folder you wish to save in along with the file name, and type. If you have already saved the document once, clicking ‘Save’ will cause the screen to flash, and your documents updates will have been saved.

In Save in: Click the Down arrow to the right to select the folder you wish to save in. In File Name: Type the name of the document.
Choosing Save As type is for:
When you have created a template or document, typed in some additional text (or took some out) and want this document to be saved without changing the original template, choose ‘Save As.’
If you want to password protect this document, in the ‘File>Save As’ dialog box, choose Tools>Security Options.
If a password is required to open the document, enter a password in the ‘Password to Open’ text box. You will be prompted to enter it once more.
If a password is only required to modify the document, enter a password in the ‘Password to modify’ text box. You will be prompted to enter it once more.
You can have a password for both, if necessary.

When you have made all of your choices, select ‘Save.’
Toolbars
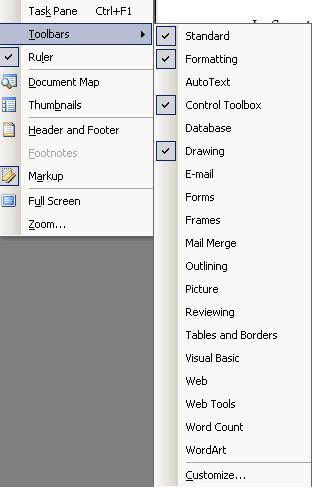
Toolbars are a nice, easy way to make changes on your document in a single click. If you want some items to appear on the toolbar, click on View>Toolbars. From there you can select many different options so that they appear at all times. Click on each of them to see the options they give you and choose the ones that you want.
You may already have in mind a particular font that you use. For this example, we will use Californian FB. If you wanted to change the text to Californian FB on a document that is already completed with an Arial Text:
1. Highlight all the text by clicking Edit>Select All. This will highlight all text in the document.
2. Click on Format>Font. The following dialog box appears:

3. Choose the desired text from the down arrow in the font field. You can also change the font style, size, color, underline style and special effects if you click the down arrow in the Font Style field Size field, Font Color, Underline Style fields. Experiment also with the Effects field by checking each option off and viewing its appearance in the Preview field at the bottom of the dialog box. (If you want to ALWAYS have this font style, size, color, etc., click the Default button on the bottom left of the dialog box).
4. When you have chosen your desired Font formatting, click Ok and you will be brought back to your document.
You can also select your font before you type anything on the document by using steps 2-4.
Please Note: When you change text on a document you have already formatted, this font change may ALSO affect the spacing and formatting of your document. You will want to look over your document to make sure the spacing and formatting is correct.
Spell Check
Whether you have completed your document or you are still creating it, you can have Word perform a spell check for you to locate any errors and suggest replacements. To do so, simply click on Tools>Spelling and Grammar. One of the two screens below will appear depending upon whether a grammatical or spelling error exists. The upper box will contain the actual text from your document. The bottom box – (labeled Suggestions) will contain either grammatical suggestions or possible words that may fit what you may have meant to spell, (or it will simply say No suggestions). You then have four options. They are:
1. Ignore-Ignore Word’s advice as you may have typed it exactly as you want it after all, for example an acronym or name of a company.
2. Ignore Rule -Ignore the rule that Word suggests.
3. Next Sentence-Skip to the Next Sentence
4. Change-If you agree with Word’s suggestions. This will automatically change the grammar in its location.
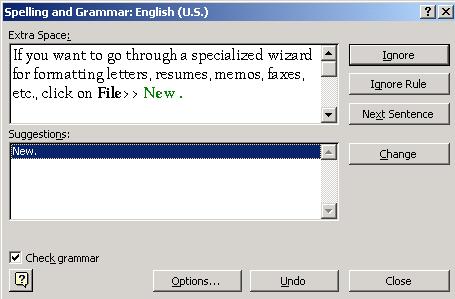

You may also see the following (as shown in the above box).
1. Ignore All-if that last name is listed many times.
2. Add-Add the unaccepted text into Word’s dictionary so that it will not appear in spell check as an error.
3. Change-Use this if you made a mistake and accept Word’s suggestions. Since there may be more than one suggestion, make sure you highlight the one you want to accept before clicking ‘Change.’
4. Change All-If you realize that you have incorrectly spelled a certain piece of text incorrectly, click ‘Change All’ to correct any duplicates of that text.
Find and Replace
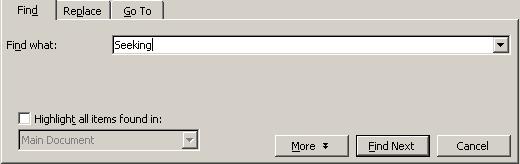
There may be times when you have written or are reading a document and want to find a specific word or phrase, perhaps a distinct word that you wanted to revisit. To find it easily, select ‘Edit’ from the toolbar. Then select ‘Find.’ From the dialog box that appears, type in the word you are seeking. If there are multiple instances of this word, you can keep clicking ‘Find Next’ until you find the correct instance.
Along those same lines is the ‘Replace’ function. Suppose you were typing a letter to Mr. Smith and you just realized his name is spelled ‘Smyth.’ You can look for all instances of ‘Smith,’ whether there is one or one thousand and replace it with the name ‘Smyth’ with just a click of a button. It makes life a lot easier! To do so, select ‘Edit’ from the toolbar. Then select ‘Replace.’ In the find box, you would enter ‘Smith’ to search for all instances and then in the ‘Replace with’ box, you would enter ‘Smyth.’ For this particular situation, you would select ‘Replace All’ but for other situations, you may only want to replace it one time, so you would just select ‘Replace.’

Once you select ‘Replace All,’ you will see a message that says:

Just click on the ‘OK’ button and you are finished!
Bullets and Numbering
To begin adding or numbers to a document for a formatted list as shown in these instructions:
1. Click on Format>Bullets and Numbering. The following dialog box will appear.

You can also format the appearance of bullets you choose. To do this,
- From the above screen, click on any bullet format, except ‘None,’ and click customize.
- The following screen will appear:

- Click on ‘Bullet button’ to view the screen below.
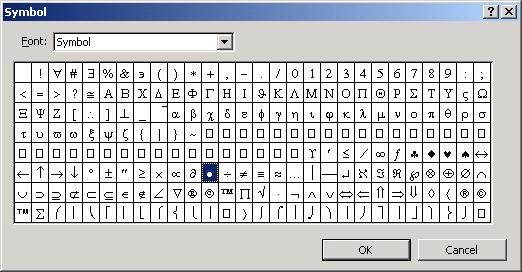
- Move your cursor around the screen to choose a bullet you like. For even more options, click on the down arrow in the Font screen.
- Once you have found the bullet you want, click ‘OK.’ Then Click ‘OK’ again to return to your document.
- This same method can be used for numbering; however, the screen will appear a little differently.
- Click on the Numbers tab and then click on customize to view the following screen.

- Click on Number Style to change it what type of number style appears.
- Start at- You can determine what letter or number you want to start at. On this screen, you can also change the Font, number position and alignment by just clicking on the corresponding down arrows.
- Click ‘Ok’ and then click ‘Ok’ again to return to your document.

1. Select Format>Paragraph
2. On the screen that appears click on the down arrow labeled Alignment and choose how you would like to align your text.
3. On this screen you will also be able to modify indentation position and spacing.

To insert breaks in your document:
1. Position your cursor where you want to make the page break.
2. Select Insert>Break.
3. The following screen will appear:
4. Choose the option that best describes how you want your page break to appear.
5. Then Click Ok.

Inserting Page Numbers
To insert a page number into your document:
1. Click on Insert>Page Number to display the following screen.
2. Choose where you want to position the page number and choose the alignment as well.
3. If your first page is a cover page, you may not want to start numbering on the first page. If this is the case, uncheck “Show number on first page."
4. Then click ‘OK.’

Inserting Date and Time
1. To Insert Date Stamp; Time, click on Insert>Date and Time.
2. Select the format of the date or time you wish to insert.
3. Click ‘OK.’
4. If you do not want this date to change every time you open the document, uncheck ‘Update automatically.’ For example, if you have inserted the date on a contract as “Contract Date,” you wouldn’t want that to change to the current date if you open the document to view it two years from the actual “Contract Date.”

To automatically insert normal greetings or closing lines to your document:
1. Click on Insert >AutoText.
2. Click on the type of AutoText you wish to insert and that is all. It is that simple!

For those of you who are thinking, “This is all too easy,” that is because Word is very user friendly. Once you obtain knowledge of what is available to you, there should be no problems working in Word. It may even be fun, can you imagine?
Now that you have mastered the basics, we can move on to some more interesting stuff, such as dressing up your document… in a tux. Just kidding, wanted to make sure you were paying attention!
Columns
If you are seeking a career in a printing company, this next topic may be of interest to you. As you can see, I am writing this in two columns worth of space, just like newspapers and magazines, which is what I will show you.
To have your document print in two columns, follow these easy instructions.
1. Type your document
2. Highlight the text you want to convert into columns.
3. Select Format>Columns. A dialog box appears, as shown below.

4. Choose how many columns you want under Presets. Or select the number of columns under Number of Columns.
5. If you want separate width and spacing for each column, you can specify this under Width and spacing.
6. On the right you will be shown a preview of how your document will look.
7. You also have the option to ‘Apply to: “This section,” meaning the text that you highlighted, “This point forward, “or the “Whole document.”
8. Voila, you have just created your first Newspaper article, and you learned how to spell “voila.” Things are getting better by the minute!
Okay- that's part I. Stay tuned for next Thursday, part II. I will go over:
Change Case
Backgrounds
Themes
Inserting a Table
Converting Text to Table
Converting Table to Text
Hiding Gridlines
Undo/Redo
Word Count
Help!
Copyright 2010 Elizabeth Parker
Author of Finally Home, Final Journey, Bark Out Loud!, My Dog Does That! Unwanted Dreams, Phobia, Evil's Door and Faces of Deception
No comments:
Post a Comment